SiteSpinner Pro Tutorials banner
< Tutorials Home
Objects

This tutorial contains an overview of objects -- things you put on your page -- and the use of the Object Editor in particular. Included here are these topics:

What is an object?
The Object Editor
Object Editor > Components tab
Clean components
Geometry
Shading
Moving, scaling, rotating and skewing
Naming objects and components
Object Copies, Clones and Includes
Cut, Copy, Paste and Delete
Clones and included objects
Try an include
Changing page order
Sharing image files
Object Editor > Transformations tab
Object Editor > Link tab
Object Editor > Options tab


What is an object?

An object is the principle element displayed on a page. When you select text or a picture and move it with your mouse, you are selecting an object. An object comprises several components including geometry and shading.  An object does not need to have any of these components but it must have a geometry component to be visible. The object itself includes transformations which determine its location, scale, rotation and skew.

Objects can share components. Many objects for example, may use the same shading. If you change the internals of the shading component, the shading on all objects that share the shading component will also change. This provides a convenient means to use common features throughout your project.


The Object Editor
Open the Object Editor with one of:
SiteSpinner Pro logo
Object toolbar
Object Editor button
Object Editor > Components tab

Opening the Object Editor > Components tab will show the components the currently selected object is using:
Geometry: the shape and size of the object
Shading: the color of the object
Sound: the sound an object make when performing some behavior
Action: the movement the object makes
Behavior: what the object does in response to certain events like mouse-clicks

All five fields work in the same fashion. Click the button on the left of any field and you open the appropriate editor for Geometry, Shading etc. By selecting a component from the drop-down list boxes, you can attach a Geometry, Shading etc to the current object. Detach a component from the object by selecting No Geometry, No Shading etc from the drop-down list boxes. You can attach only one component of each type.

In this tutorial, we will discuss Geometry and Shading further. The other components, Sound, Action and Behavior have their own tutorials.
Object Editor Components tab
Clean components
The Object and Publishing editors and also main menu Edit > Clean Components, include a Clean operation that can be used to remove any objects or components that may have become orphaned -- no longer used anywhere in the project.

See also (on the Components tab):
Use of the Page Copy Method
Unique Includes and Clones


Geometry

Geometry is the visible component of an object. The different types of geometry include shapes, images, text, and forms -- others too. Geometry also includes a vector outline. This will be a rectangle for many things, like text, but shapes can be non-rectangular.

  1. Select the circle on the left toolbar to create an ellipse geometry
  2. Select the Outline tab in the Quick Editor. Adjust the Thick slider to 3 to add a thicker outline (3 pixels wide)
  3. Adjust the RGB (Red, Blue, Green) sliders to assign a dark blue color to the outline
  4. Open the Geometry Editor on the Tools toolbar. Explore some of the additional operations that are available.
The items on the Geometry Editor > Outline tab are a close match for what you have just used in the Quick Editor > Outline tab.

Object Editor button
Ellipse button
Quick Editor button
Geometry Editor button
Circle with border
Shading

The shading component describes how the interior of an object will be shaded. This is different from the outline you shaded just above. Shading can be
Use the Quick Editor > Shading tab to adjust the color, brightness and contrast of an object. For more, see Gradient fills.

You can also apply Scaled Texture, Stretched Texture or a Tiled Texture. Shading also includes transparency and transparency mapping. When applied to text geometry,  shading changes the background color of the text. For more, see the Rendering and Shading tutorial.

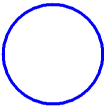
Let's try a bit of shading. Select the circle again and:
  1. Open the Quick Editor > Shading  tab. The circle should still be white inside. Notice that this shows as [no shading] in the Quick Editor. What you are really seeing as white is the white page background showing through
  2. Select Radial at the bottom of the Quick Editor
  3. Select the color 1 button and adjust the RGB sliders to create a light blue color.
  4. Select the color 2 button and adjust the RGB sliders to create a dark blue color.
  5. Adjust the Transparency slider to see the effect.
  6. Open the Shading Editor > Fill Settings tab. Move the cross bar with your mouse to adjust the location of the highlight
  7. Return to the Quick Editor > Shading  tab and select Flip
  8. Assign a texture map to the object
  9. And why not try a transparency map as well?
Quick Editor button
Shading Editor button
Starting cicle
Circle with flipped colors
Texture map (tiled)
Transparency map
Starting circle
Flip colors
Texture Map(Tiled)
Transparency Map (removing blue + grey)
Moving, scaling, rotating and skewing

An object includes transformations that determines its position, scale, rotation and skew. Change these with keyboard and mouse, or with the Quick Editor or Object Editor. More in the Manipulation tutorial.
  1. Make a circle object and move it with your mouse so that it is visible while reading these instructions
  2. Hold the Shift key down then press the Left Arrow key to squash the circle into an ellipse
  3. Hold the Ctrl key down and press the Down Arrow to rotate the ellipse to about 45 degrees
  4. Open the Quick Editor > Object tab. The Quick Editor will show the angle in the Rotate box 
  5. Note that with the Quick Editor open, the keyboard rotation is quite sluggish. If you have the Quick Editor open, it is easier to do the next steps instead
  6. Enter 10 into the Quick Editor > Object tab Rotate box. Use the rotate arrows to return the rotation to zero degrees.
Ellipse
Naming objects and components

When you create any object, SiteSpinner will automatically create a unique name for it and display it in the:
For an important object, change the name of the object and its components to something more descriptive by typing the new name into the edit boxes. Do not use blanks or punctuation -- stick to letters and numbers. More on Naming.


Drop-down object list
Quick Editor button
Object Editor button
Try some renaming:
  1. Make sure the Quick Editor is visible. If not, press Ctrl+Q. Select the Object Editor > Components tab. Both the Object and Quick Editors will now be open
  2. Click on this text object with your mouse. Find its name in the four places listed above. In contrast to the other two, the toolbar list displays only the objects on the current page. The others display the objects for the whole project
  3. Select the ellipse. Its name will now be displayed in the object drop-down list boxes
  4. In  the Quick Editor, replace the name that is displayed with ellipse
  5. Select this text object to see its name, then select the ellipse again to confirm its new name has stuck
  6. With the object ellipse still selected, select the Quick Editor > Shading tab
  7. If it is showing [no shading] as the shade, move the color sliders to create an instant new shade. Or better, make it a gradient fill that you will recognize again
  8. Enter the name ellipse into the shading edit box
  9. Open the Geometry Editor > Options tab and enter the name ellipse into its edit box.
You should now have an object called "ellipse" which has geometry and shading components that are also called "ellipse".

Ellipse
Object Copies, Clones and Includes

When duplicating objects, there are significant differences in the three ways you can do it. Following is the most important section of this page:
 
Copies
of objects are completely independent of each other. Changing one will not affect the others.

Clones
are identical twins. They differ only in transformations -- that is, position, scale, rotation and skew. For aspects such as color or size, if you change one, you change all. Change the position of a clone on a page and it will not affect other clones either on the current page or on different pages.

Includes
are identical Siamese twins. If you change an include on one page (even only a position change), you change it on all. You can have only one include of a particular object on a page. If you want more near-identical copies on the same page, make them clones.


Cut, Copy, Paste and Delete

Duplicate an object and its components using copy and paste. The new object will be a completely independent replica of the original. Changes made to either the original or copy will not effect the other. To copy the current selected object, use the Copy and Paste buttons, (workpage top left) or the Edit menu items, or press Ctrl+C and Ctrl+V (standard Windows shortcuts). Copy copies an object from your page to the clipboard, paste copies from the clipboard to your page.

Remove an object by either Cutting (Ctrl+X) or Delete (Delete key), but there are differences:
Cut, copy, paste buttons
Clones and included objects

Recall that an object can share its components with other objects. This provides a convenient means to create common components that can be shared among different objects.
  1. Use the Rectangle button to create a new rectangle object. In the Quick Editor>Object tab, change the name of the object to rectangle
  2. Open the Geometry Editor > Options tab and change the name of the geometry to rectangle
  3. Open the Shading Editor >  Selection tab. The name in the Shading drop-down list box will be something like shd123 which indicates the name of the new shade the rectangle would get if you added one
  4. Open the drop-down box. Notice how the colors are displayed -- unlike the Quick Editor > Shading tab.  Scroll down to find the shading component called ellipse. It will be near or at the bottom since you just created it. (Maybe!)
  5. If you were creating a new shade you could apply it to the rectangle now
  6.  However, because you will reuse an existing shade, you must do that through the Quick Editor
  7. Close the Shading Editor and open the Quick Editor > Shading tab
  8. Scroll down the drop-down list box and select the ellipse color. This time it will be applied to the rectangle. The objects "ellipse" and "rectangle" are now using the same shading
  9. In the Quick Editor, adjust the RGB sliders to select new colors 1 and 2.  Notice how the colors change in both the rectangle and the ellipse as you make the changes
  10. Select the ellipse and open the Quick Editor > Outline tab
  11. Open the geometry drop-down box to find the "rectangle" geometry and select it
  12. After you reply "yes" to an "Are you sure" prompt, the ellipse should change to a rectangle.
Rectangle button
Geometry Editor button
Shading Editor button
These two objects are now clones (sometimes called Instances) since they share the same geometry and shading. The only differences between the two are their transformations. You can position, scale, rotate, and skew them independently but if you change the shading or geometry (say, add rounded corners), they will both change. Examples of where this becomes very convenient are:
Whereas clones are different objects that share the same components, an included object is an object that is shared by more than one page in a project. As well as geometry and shading, the include shares the same transformations. If you change an included object on one page including location and size, it will change on all pages on which it is included.


Try an include
'Include On' selection

You should have a window appear like the above. Nothing happens until you click the OK button, so try the controls and see the effects:
All Pages
: check all pages in the project
No Pages
: uncheck all pages in the project
Current Includes
: check all pages which already include the current object
OK
: Apply the changes you marked
Cancel
: Exit the include dialog without making any changes

And the checkbox: Remove included object from un-checked pages: If the object is already included on other pages, but the boxes for those pages are unchecked, clicking OK will remove the object from those pages.

Continuing with the instructions for your own include:
The include operation is a powerful feature that provides numerous benefits:
Changing page order
As you create each new page, it appears at the bottom of the drop-down page list at the top of your workpage and also in the Page Editor. You may prefer a different grouping, perhaps wanting to group similar pages together. 

One way to do this is through the Page Editor > Page Select tab. You can also do it from the Include On list/menu, shown above, while you are doing an include operation. If you have kept your page names short, the list will divide neatly into columns as shown. The order is strictly column-by-column left to right:
Page Editor button
Sharing image files

If you want clones or includes to share the same image file as well as other attributes:

Open the Object Editor > Components tab and uncheck the boxes Unique Clones and/or Unique Includes. The default is for these boxes to be checked, which means that a separate image file will be produced for each clone or include. For clones, because the transformations may be different, you will often want unique clones. In either case, background colors may be different, so again you might want different images. But if you are satisfied that one image file will do for all, uncheck those boxes.

If you are cloning or including an object, and you want to re-use the same image,  you may need to do all of the following things for your source object:
This project includes some Included objects on most pages. Can you spot them?


Object Editor button
Geometry Editor button
Quick Editor button
Object Editor Components tab
Object Editor button
Object Editor > Transformations tab
Select the Transformations tab. This is an expanded version of the Quick Editor transformation operations. The Reset button will reset all the object's transformations to their default which will cause the object to appear at the top left of the workpage. (Because it sets the position to 0). Contrast with the Reset button in the Quick Editor Object tab which does not change the position.

Tutorials banner
Object Editor Transformations tab
Object Editor > Link Tab

Select the Link tab -- use this to assign a link to the object. Along with the Quick Editor > Link tab, this is the primary way to assign a link to an image, title or shape. Links within a text object will take precedence over links made by the Object or Quick Editors. You probably would not want to assign a link to a large text object like the one holding the text you are now reading. But sometimes you can do it accidentally -- then you will see a big mass of underlined text.

See also Links: Problems with links

Object Editor button
Object Editro Link tab
Ellipse
Object Editor > Options tab

Select the Options tab. Use these options to omit the object when publishing for certain outputs, to hide an object while a page is loading and to create simple mouse over effects.

Select the ellipse object to the left and Open the Object Editor > Options tab. Check the box Hidden on Mouse Over. Exit the Object Editor and preview the current page (single-page spyglass or F7 function key). Locate the ellipse object and move your mouse over it. This should cause it to disappear. See also: Special Effects.

Object Editor button
Preview current page
Obejct Editor Options tab
Checked
Click the Help button in the Object Editor for information on the other operations that are available.

Help button