Behavior Editor
SiteSpinner Pro provides a Behavior component that may be attached to an object. A Behavior is a made up of events and actions triggered by those events. In this tutorial, we cover the following topics:
Describing behaviors At its simplest, a behavior may define a mouse click that makes an object toggle between visible and invisible. Or you may make a sound when your visitor clicks on an object. At its most complex, a behavior may be triggered only when a predefined set of events (related or not) are true. Such an event trigger may result in the object changing its behavior so that a different set of events are needed to trigger a new action.
A behavior can be in one of two states. These are "Active" and "Not Active". You can define the two states -- and they can be very different from the usual meanings of the words. For example, a behavior may impart visibility and motion when not active and invisibility with no motion when active. The switch between the "Active" and "Not Active" states is determined by a set of event triggers. Three types of event triggers are possible:
User Events -- caused by a user interaction such as a mouse selection or keyboard entry
Dynamic Events -- caused by an event such as a timer, object intersection or a counter reaching its trigger point.
External Events -- caused by an external event such as another object triggering this behavior into its "Active" or "Not Active" state.
Event triggers may be combined with the logical AND / OR operators to create more complex combinations of triggers. Extremely complex triggers may be created by the careful use of object formulas. In a game, for example, a behavior may be created to display a message only if a sequence of events occurs in a predefined order. By applying formulas from the event behaviors to the message behavior, you could create a unique number to trigger the message behavior.
When a behavior switches between the two states, it can perform operations that you define. These are Links, Actions, Formulas and Metamorph -- you'll see those tabs in the Behavior Editor.
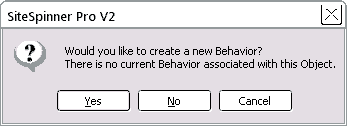
When you open the Behavior Editor, and the object selected has no behavior already assigned, you will see a dialog box like the one above. If you want to assign a new behavior, Click "Yes". If you want to edit an existing behavior, click "No"; otherwise click "Cancel". If you open the Behavior Editor without an object selected, it will open directly to one of the tabs below -- you will be expecting to edit an existing behavior.
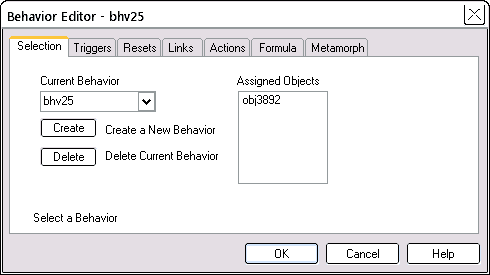
Selection tab
Name Displays the name of the current behavior. Use the drop down box to select or edit another behavior.
By default, names will be assigned as bhv1, bhv2. bhv3 etc. Change these names as necessary to better describe what they do. To change the name of the current behavior, type a new name into the edit box. Behavior names must contain nine or fewer characters, must not start with an alphanumeric character and must not contain any special characters.
Change name
Create Creates a completely new behavior.
Delete Deletes the current behavior. Any objects using this behavior will have it removed.
Assigned Objects Lists all objects that contain this behavior component.
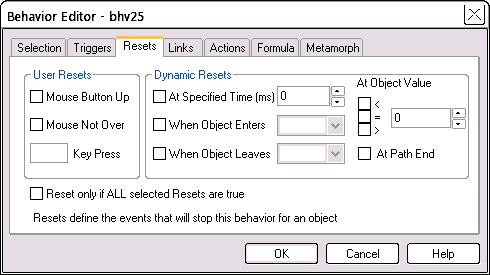
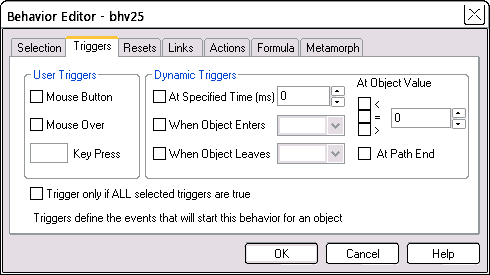
Triggers and Resets tabs
Triggers and Resets are so similar that we will discuss them together. In preview, mouse over the image above to see the difference between the two tabs.
Triggers cause an object to enter the active or triggered mode. When an object becomes active, it will perform the "When Active" operations until a Reset occurs. At that time, the object will return to its inactive state.
Resets cause an object to enter the the inactive mode. When an object becomes inactive, (un-triggered or reset) it will perform the "When Not Active" operations until next Trigger re-triggers the behavior.
User triggers depend upon an action by the user. Dynamic triggers are initiated by a condition such as a counter or object intersection. An object can also be triggered active or inactive externally by another object.
In preview, mouse on and off the image to see the difference between Triggers and Resets
Mouse Button and Mouse Button Up A Mouse Button event occurs when you click the object with the mouse, and hold the mouse button down. A Mouse Button Up event occurs when you release the mouse button.
Mouse Over and Mouse Not Over A Mouse Over event occurs when you move the mouse cursor over the object. A Mouse Not Over (leave) event occurs when you mouse off the object. For non-rectangular shapes, the active area is actually the rectangle containing the object.
Key Press A Key Press event is caused by pressing a keyboard character down. Enter the required character into the edit box. If you enter multiple characters, only the first one has any effect. They are case sensitive -- "a" and "A" count as different characters.
At Specified Time The behavior starts or ends after a specified time interval has elapsed. The spin edit box is calibrated in multiples of 10 milli-seconds (approximate). Thus for a delay of two seconds, enter "200"; ten seconds = "1000".
For a trigger, the time counter starts as soon as the object becomes active. For a reset, the count starts when the object becomes inactive.
When Object Enters The behavior starts or ends when another object intersects an object using this behavior. Actually it is not a true intersect -- just a touch of the objects' rectangles is enough. Whether the intersecting object is in front or behind makes no difference.
Select the intersecting object from the combo box.
When Object Leaves The behavior starts or ends when another object that might intersect an object using this behavior does not do so, or no longer does so. Again, select the non-intersecting object from the combo box.
At Object Value An event caused when the formula becomes true. Select any combination of equals "=", less than "<", or greater than "'>" and the value to be compared to the object's value. See the Formulas tab for more details on how to change an object's value.
At Path End The behavior ends when the object has completed tracing a path. The number of times an object traces a path is specified by the path counter of an Action component.
Trigger only if ALL selected triggers are true (same for resets) When the appropriate box is selected, all selected triggers or resets must be true to start or end the behavior. When the box is not selected, any trigger or reset will start or end the behavior.
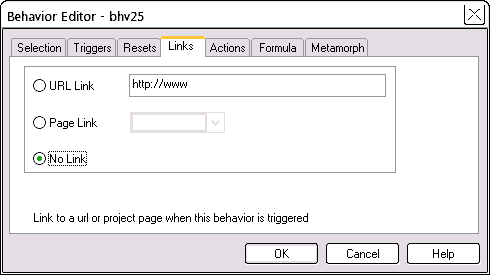
Links tab When a behavior is triggered, activate a link with this tab. This means you can jump to another web page when a certain event occurs.
URL Link Links to the specified URL. Enter the correct URL into the edit box. This could be a normal full URL starting "http://www."" or it may be a bookmark on the same page starting with "#". Or it may be to change a page in an i-frame.
Page Link Links to another page in the current project. SiteSpinner Pro will enter the correct path to the referenced page. Select the page from the drop-down list box.
No Link Disables any link.
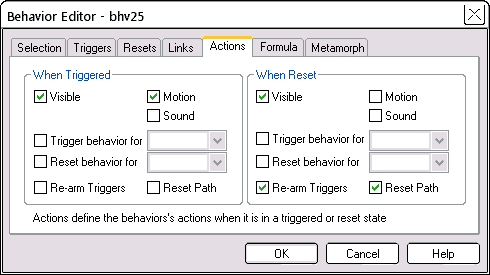
Actions tab The Actions tab initiates actions when a behavior is triggered by one or more triggers. Inactive states are triggered by one or more resets. The "When Triggered Active" and "When Not Active" states are identical in their operation and only differ in when they are applied. Below, we discuss "assigned object(s)" These are the objects listed in the Behavior Editor > Selection tab as "Assigned Objects".
Visible When checked, the assigned object(s) will be visible. When unchecked they will be invisible. For example, to make an object appear and disappear as the mouse moves over it, set the appropriate triggers and resets from the Triggers and Resets tabs. See the Show/Hide example.
Motion When checked, allows the assigned object(s) to move. The motion is that defined by the Action Editor. In order for an object to move under the control of the Behavior Editor, it must have both a behavior and an action assigned to it. If in doubt, what is assigned to a particular object, look in the Object Editor > Components tab.
When unchecked, prevents assigned object(s) from moving, regardless of whatever actions they might have set in the Action Editor.
Sound When checked, the behavior will initiate a sound. For more, see the Sound Editor.
Trigger behavior for When checked, anything that triggers/resets this behavior will also trigger the behavior for another object. From the combo box, select the other object to be triggered. For this to work, the other object must also have a behavior.
Reset behavior for When checked, anything that triggers/resets this behavior will also reset the behavior for another object. From the combo box, select the other object to be reset. For this to work, the other object must also have a behavior.
Mouse me example
If you open the Object Editor for the Mouse Me object, you'll see that is has a Behavior component called MouseMe and a Sound component called "pop".
The behavior is triggered by a mouse over and reset by a mouse not over (leave).
Actions make the object invisible when triggered, and visible when reset; Also, they make the the sound both when triggered and when reset.
Mouse Me!
Re-arm Triggers Once triggered, behaviors remain triggered until they are reset. So until a reset from somewhere, a behavior will not be triggered again. Checking the Re-arm Triggers checkbox allows the change to reset the behavior so that it can be triggered again.
If the behavior is in the Active state, this operation will allow the behavior to be re-triggered. Any existing actions still running will continue. When re-triggered, the behavior will start again from the beginning -- without passing through the inactive state.
If this checkbox is unchecked and the behavior has previously been triggered, no more triggers will be possible unless the object is reset by an external object.
Reset Path When checked, the assigned object(s) will start at the beginning of its motion path with path counter set to zero, or its assigned initial object value.
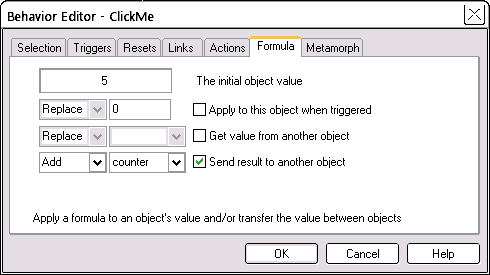
Formula tab "Formulas" (for some of us!) bring back the horrors of our school days. But rest easy, the formulas here are very simple, involving only basic arithmetic. A formula is just a rule to change the value of an object -- perhaps add one to it. A value is just a simple whole number -- every object has one.
A behavior can apply a formula to an object's value, and after a series of behaviors the object's value may reach the trigger value. If so, this can then switch the object between the "Active" and "Not Active" states. Settings to control this are in the Actions tab.
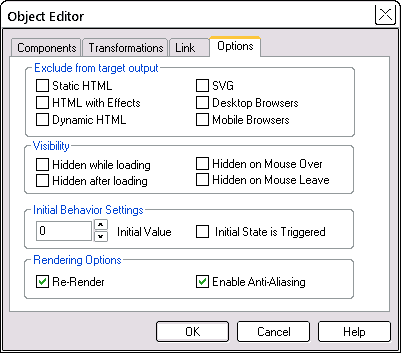
The initial object value Use this edit box to view (read only) the trigger value for this behavior. To have this behavior apply to an assigned object, the object's current value must reach the exact trigger value set here. If it exceeds the value, the behavior will not be triggered. The initial object value is zero but can be changed in the Object Editor > Options tab > Initial Behavior Settings > Initial Value.
Operations -- Replace and more
Below the trigger value line, there are three drop-down list boxes initially showing the word "Replace". Initially disabled, these boxes become enabled when you check the associated checkboxes. The list boxes identify the operation to be applied -- select one of:
Replace -- replaces the current value with the new value.
Add -- adds the new value to the current value.
Subtract -- subtracts the new value from the current value.
Multiply -- multiplies the new value with the current value.
Divide -- divides the current value by the new value. The new value must not be zero. Fractions are disregarded.
The current value is the value stored in the object, while the new value is the new value calculated by applying the formula.
Apply to this object when triggered Use the right edit box to enter a new value to be applied, via the formula, to the assigned object(s). As described above, use the left hand drop-down box to choose the operation to be applied to the current and new values.
Get value from another object Use the right hand drop-down box to select the object to retrieve a new value from. This is the current value of that object. As before, the left hand drop-down box allows you to choose the operation. This formula is applied after any change made by the "Apply to this object" choice.
Send result to another object The results of the above two operations, if any, are applied to the current object -- the object that has just been triggered. This option takes the value of the current object, whether it has changed or not, and sends it to another object. Use the right hand drop- down box to identify the object receiving the new value. As before, the left hand drop-down box allows you to choose the operation.
Using a counter
In Formula we discussed how you can manipulate counter values to trigger or reset certain behaviors. It can be helpful to display a counter value. Here is a simple example to increment a counter display by 5 on each mouse click. (Left.)
A counter is a text object with the type set in the top toolbar to "Counter". We have also given it a name "Counter" so that we can recognize it easily. Enter the initial display text to say "0".
For the "Click Me" object, in the Object Editor > Options tab, set an Initial Value of 5 -- this is the increment to be added to the counter on each click.
0
Click Me!
Create a behavior for the "Click Me" object such that it triggers on Mouse Button and Resets on Mouse Button Up.
Then have the behavior send a value to the counter via the Formulas tab -- image below.
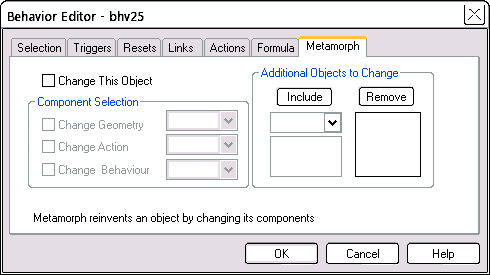
Metamorph tab
Each object may contain several components such as Geometry, Shading, Action and Behavior. See the Objects tutorial for more information. Use the Metamorph operations to change the components of the current object or any other object when this behavior is triggered.
Change This Object Check this box if any components of the object with the behavior are to be changed. You can change none or more of the Geometry, Action and Behavior of the object.
Component Selection If you want to change a component when the behavior is triggered, check one of the three checkboxes on the left. Select the new component from the list in the related drop-down box on the right.
Additional Objects to Change Identifies external objects that will have their components changed when this behavior becomes active. To add an object to the list, select it from the drop-down list box and press the "Include" button. To remove an object from the list, select it in the list box and click the "Remove" button.
The "List" box displays the objects that will have their components changed when this behavior becomes active. Press the "Include" button to add an object to the list.
The "Display" box on the right will help a identify selected object by displaying its geometry.
See also Action Editor -- behaviors can be based on actions. Hide and Show -- Example of hide and show using a Metamorph behavior.