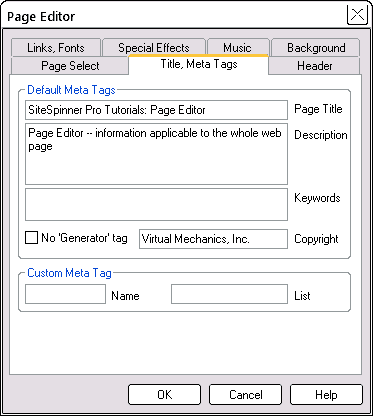
SiteSpinner Pro Tutorials banner
< Tutorials Home
The Page Editor

The Page Editor allows you to set things that affect the page as a whole -- things like background and title. It also allows you to overview the pages in your project.  In this tutorial, we cover the following topics:

Open the Page Editor
Page Select tab
Arrange button
Title, Meta Tags tab
Custom Meta Tag
Header tab
Favicon
Links, Fonts tab
Password protection
Default font
Redirect to New Location
Special Effects tab
Page Transitions (IE Only)
Tour -- Slide show with page redirection and transitions
Center Page Horizontally
Music tab
Background tab
Suggestions for page and other names


Open the Page Editor
There is a toolbar button for the Page Editor, but even without that, you can still open the Page Editor in several ways:

Page Select tab
Use the Page Select tab to choose the page you want to edit. To start with, your current workpage will show as the Current Page. Select another current page from the drop-down page list box. Notice that as you select, you see a preview of the page in a pane on the left. When you click OK, the page selected will become the workpage. But in the meantime, the current page is the one other Page Editor operations will work on.


SiteSpinner Pro logo
Page Editor button

To change the name of the current page, edit or overtype it in the Select Page edit box. See Suggestions for page and other names.

Use the Master Page checkbox to set the current page as a template.

If you want to change the extension of the published html page to something else, choose one of the extensions from the drop-down box, or enter an extension of your choice. You can have the extension apply to all pages. Apart from the name change, and any related page links, this option has no effect on your pages.

If you are creating a standard website, the extension is best left as is.


Page Editor Page Select tab
Arrange button

At the bottom is an Arrange ... button. This allows you to change the order of pages as they appear in the drop-down page lists. As you add each new page, it appears at the bottom of the drop-down page lists. Arrange allows you to change that order.
Resize the arrange window to suit your project by dragging the bottom or left of the window.

Also you can conveniently delete and rename pages here. To multiple select files for deletion, use the standard Windows methods of holding Ctrl or Shift down while you select.

Changing Page Order
Title, Meta Tags tab
Use the Title, Meta Tags tab to define how your page is titled and described by the search engines. The information you enter in this tab will appear in the <head>  (header) section of your published HTML page.

Page Editor Title, Meta Tags tab
Title

By far the most important field is the Title - this is what the search engines will index first. It appears on browser address bars, and in people's favorites lists -- we hope! Your title should be clear, descriptive and short.  For example, if you are selling organic tea, be sure that "organic" and "tea" are part of your title. For example: Jon and Joanne's Organic Tea.

This text will be entered as the <title> element of the published HTML page. If you don't enter a Title, SiteSpinner will substitute the page name. Always enter a title. Do not confuse titles with page names -- they are quite separate things -- unless of course, you forget to add the title!

Description
The Description is less important than the title and and may be used by search engines to more fully describe your page. It can be a little more wordy too. Something like  "Organic hand-made teas and extracts by Joanne Miller, Nobel prizewinner in tea blending" and extending up to three sentences. Put the key ideas of your page here. Don't use double quotes in your description.

Keywords
You can safely leave the Keywords field blank. Keywords have been, and still are, badly abused, with the result that search engines now pay them little or no attention, instead figuring out their own keywords from your text. Make sure though that your keywords are in your text!

But if you choose to use the Keywords tag: Make a list of words and phrases separated by commas that you belive people will use to search for your type of product or service. These should all be words or phrases within the body of your page text. For example, "teas, organic tea, herbs, infusion"  etc., until your imagination runs out!

Copyright

You can safely leave the Copyright field blank. You hold hold the copyright to your page whether or not you fill out this field. If you choose to use this field, enter something like "Jon & Joanne", your name, or your company name. Don't enter the date -- in the finished code, SiteSpinner automatically sets it to the current year. Again, no double quotes.

Custom Meta Tag
Occasionally, you may want to add an extra meta tag to your page that will also appear in the header of your page. This consists of two parts:
You can use upper or lower case characters here -- it doesn't matter. A useful custom meta tag is one that instructs search engines not to index your page or follow any links on it. (E.g. you may have a gallery page, and you don't want your photos to appear in search engine results.) Enter the data like this:
Name:
Robots
List:
noindex,nofollow 
When you preview or publish, this will create the following line of HTML code:

<meta name="Robots" content="noindex,nofollow">

It is a wasted effort doing the reverse, using "index,follow" since the search engines do that anyway.

This gives you only one custom meta tag. If you want more, do it with a Code Object of type "Header", or with a custom header

Custom meta tag
Header tab
For an improved method of adding header code, see Positioning code via code type. The method described here is an older one and not as convenient as the new method.

Use the Header tab to enter custom tags and scripts to the <HEAD> section of the finished HTML page. For example, if you have custom Cascading Style Sheet information, or custom Javascript code, you may need to add the code to the HEAD section of your HTML page. Click the New Header button and paste in the code.
Page Editor Header tab
SiteSpinner does only minimal error checking on a custom header, so make sure that the code you enter is valid. In particular, make sure you paste in all the needed code -- it is easy to drop off the last few characters. See also Code > Custom header.

Favicon: In the custom headers for this project, there is a custom header already in place called favicon. This allows your pages to display a little icon in favorites lists and on browser title bars. For it to work, you need to activate the header by selecting favicon as the custom header for the page. Then place a small image file called "favicon.ico" in the root folder of your site.

Sadly, favicons do not work reliably in Internet Explorer 6 or 7. IE8, at time of writing, is still an unknown. However, we have found the freeware AM-Deadlink to be very helpful with the IE problems.


Password protection

The level of security offered by this function is reasonable -- perhaps more than reasonable. But if you need really secure password protection for your pages, you should talk to your web-host.

The image just below shows the fields filled out as they are to protect our example page.
When you enter the Link on failed password, enter the full name of your error page. E.g. PassError.html -- don't forget the .html extension.

You can see our example in operation here: password protected page. The password is Password -- for your password be sure to pick something more secure than that!

Another method is in Password protecting a page (using a form). This allows you to dress up the password entry box.


Page Editor Header tab
Password protect this page
Links, Fonts tab
On the Links, Fonts tab are project-wide settings that control -- guess what? -- links and fonts:
Setting ANSI character set
Link Colors
Here is where you define the link colors for your project. More in Links: Link colors.

Character Set and Default Font
The default Character Set is ANSI. Occasionally, you may find another choice is better is better. There is an IE6 bug with page transitions that makes ANSI a better choice rather than UTF-8.

The Default Font button allows you set a default font for forms. The same font can be used by custom code that writes to the page without specifying a font or size. The default font does not affect text or code objects -- they set their own fonts.

Redirect to New Location
Use page redirection if you would like your page to automatically link to another page after a period of time without your visitor having to click a link. More in Links: Redirect to New Location.


Page Editor Special Effects tab
Special Effects tab
The Special Effects tab includes a number of special page transitional effects, applicable to Internet Explorer. For example, you can have your page "fade in" or "fade out'" "circle in" or "circle out". Visitors may find these special effects annoying, so don't over-use them.

Page Transitions
Transition IN
: The page shows the transition when the page opens
Transition OUT
: The page shows the transition when the page closes
The Duration fields are the durations of the actual transitions in seconds. Try 3 seconds to start.
There is a bug in older versions of Internet Explorer which can cause page transitions to crash your visitor's browser when using the UTF-8 character set. Avoid this possible problem by setting the character set to ANSI. It is in the Links, Fonts tab shown above.

Coupled with other features, page transitions can create unique effects. For example, you can create an interesting slide-show of your pictures by placing them on individual pages. Use page redirection, and then have the pages use one of the Special Transition effects. The result is an auto-slide show. Experiment and see what you can create.

Below is an example to get started:
The page redirections are like this (each with a 10 second delay):
Slide1 >> Slide 2 >> This page

Each slide page has a different transition in and transition out (each with a 3 second delay.

Preview all and then take the short tour


Center Page Horizontally
The Center Page Horizontally function automatically centers your page in the browser window, even though your visitor may be running a higher screen resolution than what you designed for. Without centering the page will appear at the left hand edge of the browser window, leaving a gap on the right.

If they are running a lesser resolution than what you designed for, the page will be left- aligned with a horizontal scroll bar -- centering has no effect.

To create a centered page:
When a visitor views your page, regardless of how wide their browser is set, your page will always be centered.

See also: Centering and Sizing Pages
.
Preview all pages
Music tab
If you want to add background music to your page, select the file in the Music tab. This will embed the music as part of the page. If you want to give your visitor the opportunity to control the music through a visible audio player, instead use the Embed File or Media Editor.
PageEditor Background tab
Background tab
Use the Background tab to set a background color for your whole page. You can also set a tiled background -- a very small image like a bathroom tile repeated many times. For the cost of a sometimes very small image, you can get full coverage of a very large page.

When you are setting a tiled image, you need to specify a direction, either X (across) or Y (down). Often you will specify both. If you have a long thin image, you will often want to tile in one direction only. This gives interesting effects like a page background along the top or left of the screen (as we have done on this page).
When you are tiling, you can use very thin images as your background, as thin as one pixel. Unfortunately they are too thin to make with SiteSpinner, but you can start with something bigger that you make here, then crop it down in an external image editor. There are some ready-made thin tiles in the ClipArt folder -- all are under 600 bytes in file size (tile all these in the Y direction):
The tutorial page FastStart4 has example of a thin strip tiled in the Y direction (down the page). For an example of a thin strip designed to be tiled in the X direction, try biz3_bg.gif from the ClipArt folder.

To remove a background color or tile, set a color of solid white. This is the same as the background set on a fresh blank page.

Radial, Cylinder, and Linear for background colors are only available when publishing your page as SVG.


Suggestions for page and other names

These suggestions are particularly for page names, but also apply to file names; also any objects, geometries or shades that you rename.

Legal characters
Use only letters, numbers and perhaps the underscore  character (_).  Avoid punctuation marks and spaces. There will be occasions when you can use something else and get away with it, but don't make it a habit!

Meaningful names
Always rename your pages from the default page1, page2 etc. Make a name that will mean something to your visitor and you. It is much easier to correctly link to a page called PageEditor than to one called page25.

Keep your page and other names as short as possible. If a page name runs off the end of the Page Name edit box at the top of your screen, it is too long! But also don't make it so short that it loses its meaning.

Camel Capitals. To add clarity, use a mix of upper and lower case characters. They are sometimes called Camel Capitals, because they run up and down like a camel's humps -- think of a camel with two humps!  Using these avoids the need for the underscore which adds a character to the length of the name.

Examples
For example, MyPage, MyPage3 and YourPage are acceptable, but not Peter's PagePetersPage is OK, or if you insist, Peters_Page.

For colors you will use throughout your project, use names for the shades like red, blue, yellow etc.

For more examples, see the page and other names in this project. We try to practise what we preach! But not always successfully.


Tutorials banner