SiteSpinner Pro Tutorials banner
< Tutorials Home
Finished Example
Fast Start

If you have built web pages before, this tutorial is a quick overview of some of the features available in SiteSpinner. If you want to view a finished example of what we'll do here, press the "Finished Example" link above right. In this tutorial, we cover these short topics:

Copy this page (optional)
Rename the new page (optional)
Add a picture
Move the picture
Add a link to the picture
Preview
Create a rectangle
Add shading (to the rectangle)
Add  text and link
Add a title
Shade the title
Merge the two images (rectangle and title)
Assign a background color to your page
Use a background tile
Add Meta Tags and a Title
Center your page-- a finishing touch
Cleanup
Publish your project
Next


Copy this page (optional)
As you will probably move objects on this page around greatly it is a good idea to use a copy. To make a copy of this or any page click the "Copy Page" button on the top toolbar, then the "Paste Page" button next to it. Or you may choose to make a completely new page, perhaps in a new project -- use the main menu File > New Project (Ctrl+N).


Rename the new page (optional)
Locate the drop-down page list at the top of your workpage. For this Fast Start Tutorial, the page the name appearing there should be "FastStart".  Overtype whatever name is on your page with another of your choice - something like MyStart. Always give your pages short, meaningful names, and avoid spaces and punctuation.


Add a picture
Click the Mona Lisa button (Add a Picture) to load a picture. Select your logo or use the file vmlogo.gif, the Virtual Mechanics logo from the /ClipArt folder.


Move the picture
Click the picture with your mouse and drag it to the top left corner. The exact location is not important, because you can adjust it later when the other objects are in place.


Add a link to the picture
In the Quick Editor, select the "Link" tab. Select http:// from the Link Type (left hand) drop-down list box. Type or paste your link or www.VirtualMechanics.com into the URL (right hand) box. Give the image a Title (next box down). Click the little "x" at top right of the Quick Editor to close it.

SiteSpinner Pro logo
Buttons: copy and paste page
Copied FastStart page
Tool: Image Editor
Tool: Quick Editor
Quick Editor Link tab
Assigning a link to an image
Preview
To preview what you have so far, click the single-page spyglass button at the top of your workpage.  Or press the F7 function key, the keyboard shortcut for a single page preview.

Check that the image is indeed where you expect. Hover your mouse over the image to see the title you gave -- depending on your browser, it should show as a little pop-up tool tip. Click the image to make sure that the link works.
Preview current page
Tool Object Editor
Create a rectangle
Click the Rectangle button on the left toolbar. Move your mouse to about the center of the page and click to create a 100x100 square.


Use your mouse to grab and stretch the right edge to make a rectangle.


Tool: draw rectangle
Quick Editor Shading tab
Add shading
With the rectangle still selected, select the Shading tab in the Quick Editor.

Tool: Quick Editor
Quick Editor Shading tab
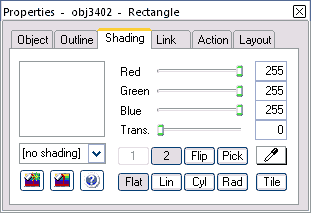
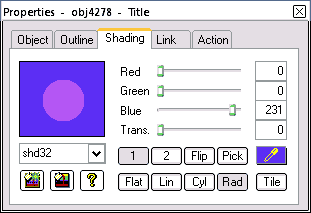
Select Cylinder (Cyl) at the bottom of the Shading dialog and the color 1 button. Adjust the sliders to make black.

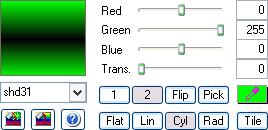
Select the color 2 button and adjust the sliders to make green. The rectangle should now look like a green cylinder.


Preview again
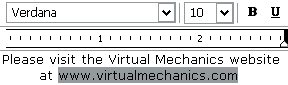
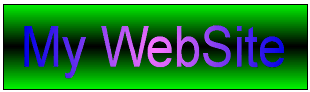
Why not? Your page should look something like this one here:

Quick Editor Shading tab showing gradient fill
Preview current page
Background rectangle
FastStart1
Add  text and link
Click the Text button on the left toolbar to open the Text Editor. Add the text shown on the right -- or your equivalent.

Center the text -- there is a button -- "Justify Center" -- on the top toolbar of the Text Editor.

To make the link on the www.virtualmechanics.com part whilst in the Text Editor:
Tool: Text Editor
Please visit the Virtual Mechanics website at www.virtualmechanics.com
Centering text
Highlighting text to make a link
Making a link on text
Click Save and Close to exit the Text Editor. Move the text object so that it is below the green bar. Use your keyboard keys to nudge it into place.

Your page should now look like this one:


Add a title
Click the Title button on the left toolbar. Add the text on the right or similar:

Click OK on the top right of the Title Editor window to exit the editor.

Use your mouse to adjust the size of the title by dragging the corners or edges. Make it a little smaller than the green box you made just before -- it has to fit in there.


Shade the title
With the title still selected, open the Shading tab in the Quick Editor. Then select Radial (Rad) at the bottom of the Shading tab and adjust the color sliders to assign the title two colors of your choosing.


Merge the two images
Drag the title so that it lies over the top of the green box.

Let's now merge what are still two separate images to make one single composite image. This will help your finished page to load faster. To do this:
Your page should now look like this:

Save and Close
Background rectangle
Please visit the Virtual Mechanics website at www.virtualmechanics.com
FastStart2
Tool Title Editor
My WebSite
My WebSite
Quick Editor Shading tab
Radial fill
Tool: Quick Editor
Title: MyWebSite
Group: MyWebSite
Re-rendering a group
Group/ungroup buttons
FastStart3
Assign a background color to your page
Open the Page Editor (CTRL + Shift + E) and select the Background tab. Use the sliders to assign a background color to the page. If you want more precision, use the Color button just below the sliders.

Page Editor button
Page Editor Background tab
Image for tiling
Use a background tile

A more interesting option is to use a small image as a tile, which the browser can then repeat in the horizontal and/or vertical directions.

Click Tile, then browse to and select the image you want to use as the tile. A small rectangular or square tile will need to be repeated in both the X (horizontal) and Y (vertical) directions, so remember to check both the X and Y boxes.

The tile we will use is even more interesting in that it is long and thin -- in fact, only one pixel high. We have named it "FastBackGr.png" and is in the Media folder for these tutorials. Because is a full page width, we need tile it only in the Y direction.

Add Meta Tags and a Title
Open the Page Editor again and select the Title, Meta Tags tab. Enter a Page Title and Description to help search engines catalog this page. Don't worry about Keywords -- they are seldom useful these days. In the Copyright field, enter your name or the name of your company. If you set this field completely blank no copyright will appear in your page. Click OK.

Page Editor button
Page Editor Title. Meta Tags
Example: Title and Description
Preview
Select the single Preview button on the top tool bar. You should now see the web page in your default browser. Return to your workpage by closing the browser. Your finished page should now look something like this:


Center your page -- a finishing touch
Open the Page Editor > Special Effects tab and check the box "Center Page Horizontally". This won't affect what you see on your workpage, but when you publish or preview, the browser will where possible, center the page in the window.

This does not work well in FastStart4, which has a fixed background tile, so we haven't done it here. But in most cases, it is highly effective, considering the amount of work required!
Preview current page
FastStart4
Page Editor button
Page Editor Special Effects tab
Checked
Cleanup
Remove unwanted objects from this page by Cutting them (Ctrl + X). Use the Delete key to remove shared objects from the entire project. Do not Delete an object unless you know that it is not included on any other pages. If in any doubt, Cut instead of Delete.


Publish your project
Open the Publisher from the top tool bar. You can publish to a local directory or publish and FTP to your remote website host. A Gather option lets you transfer any referenced files such as pictures and multi-media. Follow the instructions in the publisher to set it up for the first time.


Next
Congratulations, you now know about 10% of the features available in SiteSpinner. To find how to adapt your page for mobile use, see Fast Start -- Mobiles.

Please review the basic topics and advanced topics for more in-depth working examples. There is an index bar too, at the bottom of most pages. Detailed help is also available from the Help menu and in many of the dialogs.

If you need help with a specific problem, please visit our on-line support forum.


Publish button
Tutorials banner