SiteSpinner Tutorials banner
Virtual Mechanics Logo
SiteSpinner
®
The Workpage

The workpage is the big blank part of your screen where you can add, position and transform the objects that comprise your page. The workpage window provides a  number of aids to help you get objects placed and sized correctly. In this tutorial, we cover:

Grid guide buttons
Guide/Display options
The snap grid
Rulers and tab stops
Alignment toolbar
More on tab stops
Toolbars -- customizing
Alignment options


Grid guide buttons

On the Display toolbar above, are several grid toggle buttons. If you don't see the Display toolbar, display it via Toolbars -- customizing. Use the grid toggle buttons to turn the grids and guides on and off. In order they are:
  1.  Guide border: turning the guide border on shows a dashed blue line at the screen resolution you are designing for, say 800x600 pixels, and a center line
  2.   Grid guide: the grid guide displays a grid at fixed pixel increments. Adjust the increment size in the Guide/display options
  3.  Snap grid: enabling the snap grid moves objects you drop on your page to the nearest grid line. This helps to keep alignment precise. To ignore the snap grid while doing some operation, hold the Shift key down while operating
  4.  Ruler: the ruler toggle turns the rulers on and off. The rulers indicate the pixel positions of objects on your page and hold your tab stop settings
  5.  Tab guide lines: the tab guide lines show dashed green lines at the current tab stop positions. Use the alignment toolbar to snap the currently selected object to the closest horizontal or vertical tab stop position.


Guide/Display options

The Guide/Display options are part of the Workspace Options. To access these, right- click a ruler, and select "Options..." from the right-click context menu. Or at the top left corner, where the rulers intersect, click on the blank square.

The Guide/Display options provide similar operations to the grid guide buttons with some extensions such as adjusting the resolution of the snap grid and clearing the ruler tab stops.
SiteSpinner logo
Grid guide buttons
Guide/display options "button"
The snap grid

Use the snap grid to help align objects and vertices by restricting the current position to specified incremental values. With a value of 10, a current location on the workpage  would be restricted to pixel positions 10, 20, 30... etc.
  1. Press Ctrl+G or the grid guide button on the top toolbar to show the snap grid
  2. Press Ctrl+M or the snap-grid button on the top toolbar to enable the snap-to grid
  3. Select this text object then drag and drop it with your mouse. Its horizontal and vertical positions should move in increments of 10 pixels with the left and top edges being aligned to the grid guide
  4. Open the Guide/display options from the Options menu
  5. Check the five boxes in the guide options section at the top. Note that these all have duplicates in Grid guide buttons on the top toolbar.
  6. Adjust the snap-grid resolution to 50
  7. Click OK and move this text object again. It should now move in increments of 50 pixels
  8. Hold the Shift key down while moving the object and notice that the snap grid is temporarily disabled
  9. Open the Guide/display options again and set the guide options to your preference.
Ruler bars showing tab stops
Rulers and tab stops

Along the top and left edges of the workpage are rulers that mark pixel positions from the left or top of your page. To see them you need "Show Ruler Bar" on in Grid guide buttons.

As well as using them as visual aids, use the rulers to create tab stops to align objects along their left, right, top or bottom edges.

To create a tab stop, click on the ruler at the location where you wish a tab stop to appear. A little
L shape should appear as shown in the ruler illustration above. Use your mouse to drag a tab stop into the correct place on the ruler.  Your tab stop settings save with your project.

The edges of your design space (say 800x600) also act as tab stops.

To remove a tab stop, drag it off the nearest edge of the ruler bar. To clear all tab stops, click Clear all Tabs in the Guide/display options dialog.

The status bar at the bottom of your work-window shows numerically, the exact position of your mouse pointer.

More on tab stops.


Alignment toolbar
Along the bottom of the workpage are toolbars loosely related to alignment. If you don't see a toolbar, set it via the Toolbar Options. Here are the basic groupings:

Snap the current object to the closest tab stop position, or align a group of objects


Change an object's z-order (that is, place objects in front or behind of other objects)


Permanently group or merge two or more objects


Space and size objects equally.


Set the object to absolute or relative positioning and sizing


Alignment buttons
Front/back (z-order) buttons
Group buttons
Spacing and sizing buttons
Horizontal positioning and sizing
More on tab stops
A little way back we discussed rulers and tab stops. Let's now try some tab stops:
  1. Create a tab stop at x=40 on the horizontal ruler by clicking on the ruler. If the tab stop is not at x=40, use your mouse to move it
  2. Create a tab stop on the vertical ruler at a position just a little above this text object
  3. Click on this text object to select it and move it so that it is to the right and below the two tab stops
  4. Snap it to the horizontal tab position by clicking on the align left edge button on the alignment toolbar.
  5. Snap the text to the vertical tab position by selecting the align top edge button on the alignment toolbar
  6. Click the horizontal center button. The text should move back to be centered on your page
  7. Remove the stops you added by dragging them off the edge of the ruler
Align left
Align top
Align center
Toolbars -- customizing

SiteSpinner has toolbars that can be moved to a different edge of your workpage, and adjusted in various ways. Generally all the buttons on your workpage can be customized in some way.

To customize a toolbar, right click on any of them, or use the main menu View > Toolbar Options... This should display a window like this:


Toolbar Options
This dialog allows you to control what is displayed, where it is displayed and the size of the control buttons, large or small.
Any changes you make should appear immediately in your workpage. If you get hopelessly lost, use the Reset All button to restore the original defaults.

If you click one of the Customize buttons, you should see a display like this:
Customize Toolbar
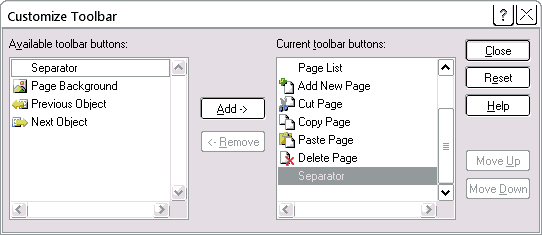
In the left panel is a list of the buttons available that you are not currently using. On the right a list that you are using. Use the Add -> and <-Remove buttons to change  buttons from one list to the other.

Use the Reset button to restore any toolbar you have "lost".

Use the Move Up and Move Down buttons to control the order in which each button appears in the toolbar

As you make each change, you will see the actual toolbar change, if visible.
Alignment options
There are a number of different ways to align objects:
Align left
Align top
Align hor center
Align left
Align right
Equal vert space
Arrange menu
See also: Manipulate tutorial