

Backups: Create and Restore
To be able to edit a project in future, you should backup the files used by your project. You can use a memory stick (USB drive), CD ROM, another drive, or some other process that does a whole drive copy. For this tutorial, we'll assume that you are copying to a memory stick.
The files required for back up are in two categories, project files and user files. In this tutorial, we will cover the following topics:
Introducing Amelia
Project files -- what they include
Reorganizing your external files
Save your project with relative paths
Project files -- backing up
User files -- what they include
User files -- backing up
Restoring project files
Restoring user files
Restoring image directories
Recovering the project file from your host
Recovering images from your host
What? You lost your project file???!!!
But first, who is Amelia?
For the purpose of this tutorial, Amelia is you, or more accurately your Windows user name. If your Windows user name really is Amelia, then this tutorial is written just for you! But if not, substitute your user name for "Amelia" whenever you see it.
Project files -- what they include
Each project is a file with a .ims extension. This is the really important file -- if you lose that you will have a difficult task to recreate your project. SiteSpinner does an auto backup, to both your local publish folder, and also to your site -- if you use SiteSpinner to upload.
There are also image files and other external files. Your project file does not actually contain the images, sound files or other import objects it needs; rather it just maintains links to the files wherever the are on your hard disk. The files remain unchanged on your hard disk in their original locations. These files are less important, because if you lose them from your local disk, you can recover most of them, with maybe some project reconstruction, from your site.
If the files are dotted all all over your disk, you make it difficult to make backups, unless you are doing a whole drive copy. For this reason, it makes good sense to keep all the files for a project in one folder, or a small group of folders.

Reorganizing your external files
During a project development, things can be chaotic with images dotted all over your hard disk. As part of a cleanup and publish, you can use SiteSpinner itself to help you get everything into one folder or group of folders. The instructions here will give you a verified complete project that you can easily backup, and one that you can use on any other computer that has SiteSpinner installed.
The steps we'll cover in this section are:
Save your project with relative paths
The default for new projects is absolute directory paths, which means you can freely move your project around on your local computer and it will always find your external files, since the project specifies the full path to each file. However, move the project file to another computer, and because the directory paths will likely be different, it won't find the external files. And the external files may be missing from the other computer anyway!
Relative paths are much less forgiving with regard to the current computer. Move a project out of its current folder, and because external file paths are specified relative to that folder, SiteSpinner will not find the external files. However if you move the external files along with the .ims project file, keeping the same relative path between externals and project file, it will find them -- even if on another computer.
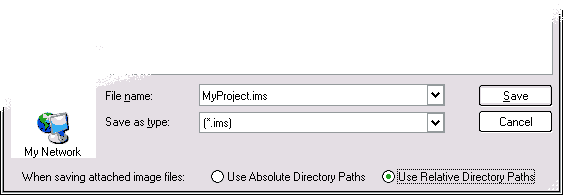
Use the main menu File > Save As, and select the radio button at the bottom (shown below) -- "Use Relative Directory Paths". If already selected, ignore the rest of this step -- you are already using relative paths.
You can either overwrite the existing project file, or save under a new name. Once you save the project file with absolute or relative directory paths, any future saves will save it the same way.
Publish and make a copy of your local publish folder
Firstly, make sure your local publish directory is empty -- especially of old image files. Otherwise you can include those files needlessly as part of your final project.
Then publish all pages to your local publish directory using the "gather" option. This gathers all the external files into just a few folders -- image/ media/ etc. Of course, make sure there are no errors recorded in the export progress log.
If you have any code or external files that SiteSpinner does not control, copy that into the correct folders too -- keep the structure of your local publish folder the same as your website.
Now copy your whole local publish directory to a new folder -- we'll call it "Final". As is your local publish directory, this folder is a backup of your site, so in the unlikely event that your host loses your site files, you could restore them from this backup, without republishing. You may wish to save this folder now as your site backup.
Delete the files you don't need
We want to save only only the files that allow us to easily reinstate and republish the project at a later date, perhaps on another computer. So let's start by deleting all the files we don't want -- those that SiteSpinner will recreate when you republish:
From the Final folder delete:
- All the .html files
- The geometry folder and all its contents.
- In the image folder delete all images that begin with "obj" or "geo" -- these are prefixes that SiteSpinner uses for all images that it creates. It follows that any images without those prefixes are original unmodified images used by your project.
This assumes that you are using the default publish file directory structure. If you have set something different, do the equivalent deletions, but from from your actual Final folder.
Modify the project so that it uses the copied images
From your Final folder, double-click your project file to open it in SiteSpinner. Don't be alarmed when you see your images are missing -- that is just what you expect. If you see all your images still in place, then you haven't saved with relative file paths.
Then reset your image directories to point at the new image folder.
You may need to make some manual adjustment to your project to change the directory for any other files, like import objects (Embed File or Media).
Find and add any missing files
You may not have captured all the images used by your project. If you have some images that SiteSpinner has modified in some way, perhaps by resizing or re-coloring, and haven't used the original image for display anywhere -- those original images won't be in your image folder. Sorry, you'll have to manually locate those, and copy them to the image folder.
You may want to add the four user files to your Final folder too.
Final republish
Republish and note the export progress log. If any required files are missing, they will produce error messages in the log. You will then need to locate the missing files, copy them into your Final folder and make any corrections to the project.
Repeat this step until you have a full publish without errors.
Project files -- backing up
To back up your project files is just a matter of copying the .ims project file, and supporting external files to your memory stick. If you have followed the instructions above, they will all be in your Final folder.
SiteSpinner also automatically backs up the .ims project file -- discussed further in the Publishing tutorial.
User files -- what they include
As well as the project files, there are four user files that may be important depending on what you have done:
- brwslist.ini: The list of browsers and startup instructions you have set for preview
- ftppro.ini: Your publishing profiles. If you have used the "Save Password" option in the Publisher FTP tab, your passwords will be here unencrypted
- urllist.htm: The list of URLs that appears in the link manager
- userdic.tlx: The list of words you have added to the spell checker dictionary
Other things you should save safely are:
- Registration Serial numbers for SiteSpinner
- Passwords and login details for your sites (may already be included in ftppro.ini)
User files -- backing up
The user files are specific to each Windows user -- even if you have multiple projects, you need save them only once.
We have assumed a primary drive of C: -- if your drive is some other, substitute your drive letter. And substitute your Windows user name for "Amelia"
Your first three user files: brwslist.ini, ftppro.ini and urllist.htm (everything in the folder) will be here:
C:\Documents and Settings\Amelia\Application Data\Virtual Mechanics\Bin
Your spelling dictionary, userdic.tlx will be here
C:\Documents and Settings\Amelia\Application Data\Virtual Mechanics\Spelling
You can copy the files individually or you can take the simple approach and copy the whole Virtual Mechanics folder to your memory stick:
C:\Documents and Settings\Amelia\Application Data\Virtual Mechanics\
This approach copies 40K of files that you don't really need to back up, but it does catch your four user files.
Restoring project files
Copy your project file from your memory stick back to your disk. If you have done a final save with the relative option, you will not need the next step.
When you restore the project, depending on where the project and images were located originally, the images may not be visible on the first re-loading. You will need to tell SiteSpinner where to find the images. Do that by opening the Geometry Editor and clicking on "New Dir". This will let you tell SiteSpinner to look in a new location for all the images that were in the old location. For more details, see Restoring Image Directories.
Restoring user files
You will need to restore your user files only in the event of a hard disk disaster which has required a new hard disk or a reformat, or when running your project on another computer. In this case, you will have a fresh copy of SiteSpinner, that will be using the default copies of the user files (mostly empty). If your SiteSpinner is registered, re-enter your registration details.
Shut down all copies of SiteSpinner -- if you don't, you may find you can't update the user files. The exact steps you take here will depend on just how you saved your user files, but they just involve copying your saved user files (if they exist) over the existing user files.
If you saved the whole Virtual Mechanics folder copy it back to here:
C:\Documents and Settings\Amelia\Application Data\Virtual Mechanics\
If instead, you saved the individual user files:
Copy the user files brwslist.ini, ftppro.ini and urllist.htm to here:
C:\Documents and Settings\Amelia\Application Data\Virtual Mechanics\Bin
Copy your spelling dictionary, userdic.tlx to here:
C:\Documents and Settings\Amelia\Application Data\Virtual Mechanics\Spelling
Restoring image directories
If you move your project (.ims file) or your image files, SiteSpinner may not find your images the next time you open the project. Exactly what happens can also depend on whether you saved your project with absolute or relative file paths. Instead of your picture, you will see a light grey placeholder that says "Image Not Found". This can also happen if you change the name of an image file or move or rename your image folders.
This is an image of a missing image -- not an actual missing image!
The placeholder will tell you the location that SiteSpinner expects to find the image. If the file path is abbreviated, as it will be in a small image, stretch the placeholder until you can read it all. Then use CTRL + Z to undo the stretch.
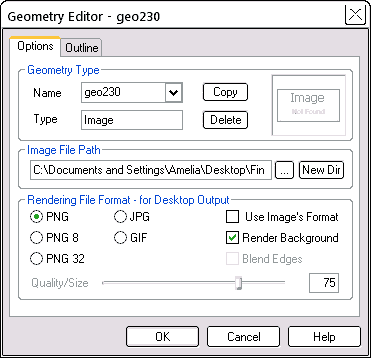
Another way to find the location is with the Geometry Editor > Options tab. If necessary, you can horizontally scroll the Image File Path edit box to view the whole path (see image below).
To correct the missing image problem, you can move or copy the images back to the original location. Or point the project to the new directory -- which is what we'll do now.
To tell your project where the images now are, click the placeholder for one of the missing images. Then open the Geometry Editor > Options tab. In the Image File Path, you will see where SiteSpinner expects to find the image. If you saved your project with absolute image file paths, this will be where the image was previously. If you saved your project with relative image file paths, it will be an invalid path relative to the current project file.
To change a single image to another location, click the "..." (file browse) button and find the image file at its new location. You could also use a completely different image. In the Open File dialog, click Open, then in the Geometry Editor, click OK.
To change the location of all the images used from the selected image's old directory, click the "New Dir" button. This will show a window like this:


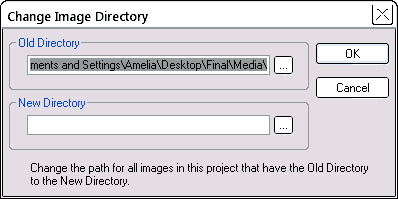
Beware! There are two directory boxes: Old and New. This window opens with the Old Directory highlighted and seemingly ready to edit. If you browse to the new directory from there, and click OK, the window will disappear and nothing will happen.
Instead, use the browse button ("...") in the (bottom) New Directory area to find the directory that now contains the images. It doesn't matter what file you click on in the new directory -- the important thing is that you select some file in the new folder. Make sure the one you choose really is the new folder you want.
Then click Open in the File Open dialog, and OK in the Change Image Directory dialog. Now you should see a warning message:
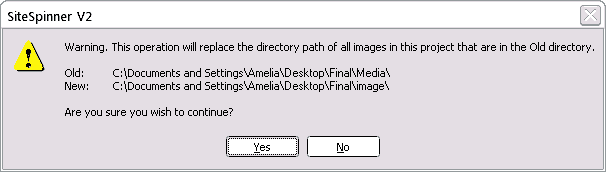
This is telling you where SiteSpinner thinks the images ought to be (Old) and where they will be after this change (New). It will not change any files or folders -- only the internal links that the project file to those image files. Avoid getting the wrong new directory. Wrong may not matter -- just repeat the steps above. But if the wrong directory is one already used for other images in your project, you may have an interesting re-sorting exercise!
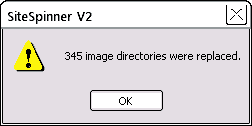
Make sure you really do want the proposed change, then click yes. SiteSpinner will respond with an information message telling you how many changes it made:
If your images were in multiple directories, you will need to repeat the Restoring Image Directories steps once for each directory.
Recovering the project file from your host
See the Publish tutorial about using auto backup to make automatic backups of your project whenever you publish. If you have uploaded your .ims project file to your site as a backup, you need to be able to download it again. Not all hosts accept .ims files so it pays to check beforehand.
To download your project file from your site, type an address like this into your browser address bar: "http://www.MyDomain.com/MyProject.ims"
- for "MyDomain.com", substitute the actual domain name of your site
- for "MyProject", substitute the actual name of your project file
After you press "Go" near the address bar, or "Enter" from your keyboard, you will likely get a File Download dialog box asking whether you want to save or open the file. Proceed with the download, and open the file to confirm that the whole process has worked.
If you can access your site via separate FTP, you should also be able to download via that process.
Recovering images from your host
In most cases you can recover your images from your host too. If you can access your site via separate FTP, you should also be able to download via that process.
If not, most browsers allow you to save a web page complete with images. Here's one way you can do it with IE8:
- Open the page in IE8 and wait for it to fully load.
- There should be no activity showing on the status bar, and when you scroll down the page, everything should seem to be in place.
- From the main menu, use File > Save As > Save as type > Webpage, complete, (*.htm;*.html)
In the collection of images you have downloaded, there will be many image names you recognize -- these will be your original source images, and you can reuse these in your recovered project.
To re-build your project, we suggest you proceed as detailed in Re-organize your external files -- allowing for the fact that your site has become your de-facto "local publish folder". And don't delete any SiteSpinner created files -- you may need those later.
When you republish to test whether you have all the external files, you will of course publish to a new local publish directory -- not your website.
Towards the end of the process, you may find that you are still missing some original images. These are likely to be those that you have scaled or modified in some way with SiteSpinner. If the original image is not directly displayed anywhere on your pages, then it will not be published to your site. Which means you can't recover it from your site.
However you can recover the modified image, and reuse that as if it was the original. To do this, look at the web page in your browser and right-click the image to see its properties -- which will include the file name, starting with "obj" or "geo". You may not already have that image, so right-click the image again and use File > Save Picture As, saving it to your "Final" image folder.
The next step is to rename the recovered image, to give it the same name as the original. If it has a different file extension to the original, let that stand. E.g, If your original was a MyImage.jpg but you now have a ObjSomething.png, set it to MyImage png. Then open the Geometry Editor for that image on your workpage, and point the Image File path at the new image.
Finally, open the Quick Editor > Object tab for the image and click the Reset button -- this will reset any transformations originally applied to that image. You have only a transformed version of that image now, so it follows that you don't need the transformations any more.
Recover the remaining images that you are missing, then republish to your local disk to confirm that there are no further missing files.
What? You lost your project file???!!!
Of course, this would never happen to you, but in case you have a friend with this problem, this is the advice you could give:
With no project file and no backups, you are in serious trouble. Fortunately you should still have the webpages on your site, or failing that, at least in your SiteSpinner preview folder. You are in the same position as someone wanting to copy an existing web site, so the same methods will apply.
As you have access to the site, the first step is to open your favorite FTP program and capture everything you can from the site.
Existing webpages cannot be imported directly into SiteSpinner. However, you can drag-and-drop the content of a webpage directly into a SiteSpinner workpage. Do this:
Open the webpage in your browser.
Select the text you want and either drag it directly, or copy/paste it into the SiteSpinner workpage.
For images, use copy/paste to place them into the workpage. If the image has no link associated with it, you can also drag the image onto your workpage. Or you may have images already as part of your site capture that you can add via the Mona Lisa button.
If the image has a link associated with it, drag the link from the image and place it over the image in the workpage.
You don't need to create all your pages at once. You may want to leave most pages as they are and only add pages to the project as they need updating.
If you want to import straight HTML, you can do that as Body code for code that needs to go in the body of the page. For code that needs to go in the head of the document, use the Code Object Header Code Type or the Page Editor > Header tab. You can also add code to a link via the Code field in the Link Editors
When you save your project, you will get messages like these below, one for each image you have added to your project. The images may be in your Internet temporary folder -- not a very permanent location. This option gives you the chance to save images to a permanent location that you can choose.

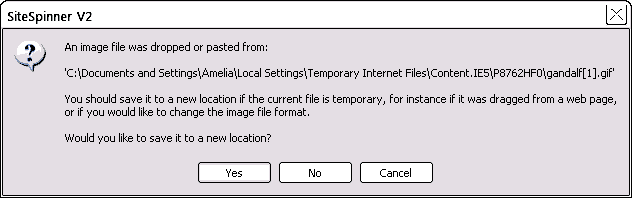
Normally, you will answer "Yes". However, if you answer "No", your project will continue to use the existing location -- rather risky if the internet, but probably not a concern for someone who operates without backups! If you answer "Cancel", SiteSpinner will not save the new image in the project.
The remaining steps are the same as for any new project you are building from scratch. Wish your friend good luck!
See also: Auto backup