Use the Outline Tab on the Quick Properties Editor dialog box to quickly adjust an object’s geometry. You may also use the Outline Tab to apply borders to image objects.
Change an object’s geometry and apply borders using the Outline Tab of the Quick Properties Editor dialog box.
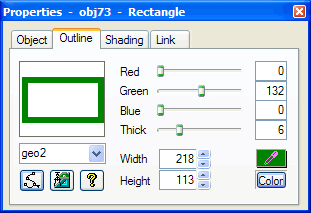
Controls on the Outline Tab of the Quick Properties Editor dialog box include the following:
| Field/Control | Description |
| Thumbnail View | Displays the geometry currently selected for editing. |
| Red | Click and drag the slider left or right to adjust the outline of the selected geometry. Or, you may enter a value in the field. |
| Green | Click and drag the slider left or right to adjust the outline of the selected geometry. Or, you may enter a value in the field. |
| Blue | Click and drag the slider left or right to adjust the outline of the selected geometry. Or, you may enter a value in the field. |
| Thick | Click and drag the slider left or right to adjust the outline of the selected geometry. Or, you may enter a pixel value in the field. |
| Width | Use the spinner to increase or reduce the width in pixels of the selected geometry. Or, you may enter a pixel value in the field. (Not editable for image object geometries.) |
| Height | Use the spinner to increase or reduce the height in pixels of the selected geometry. Or, you may enter a pixel value in the field. (Not editable for image object geometries.) |
 |
Click and drag to use the color dropper tool to pick up a color anywhere on your computer screen. Release the mouse button to set the values of the selected color in the Red, Green, and Blue fields. |
| Color | Click to open the Color dialog box and select a system or custom color. When you are finished, the values of the selected color will appear in the Red, Green, and Blue fields. For more information, see Color Dialog Box. |
| Geometry Selection | If you have opened the Quick Properties Editor dialog box without first selecting an object in the Work Window, select an object on the Object tab or click an object in the Work Window. The menu contains all geometry components in the project.) If you have first selected an object and then opened the Quick Properties Editor dialog box, the geometry component name is displayed. You can change the geometry attached to the selected object by choose another one from the list |
 |
Click to open the Vertex Editor dialog box. For more information, see Vertex Editor Dialog Box.” |
 |
Click to open the Geometry Editor dialog box. For more information, see Geometry Component.” |
| Help | Click to open a context-sensitive help topic. |

