SiteSpinner Pro Tutorials banner
< Tutorials Home
Key Frame: move and resize images

In this tutorial we detail the steps required to make an image move and expand on your finished page. For an overview, see the KeyFrame tutorial. Here are the topics we cover:
Basic steps to move and resize an image
Editing the action
Editing the path


Basic steps to move and resize an image
In preview, click your browser's refresh button to see the animation in the image below.  Or,
click here  for the action. To make an image perform like this, take the following steps:
SiteSpinner Pro logo
Lake image
1. Using the Mona Lisa button, add your full-size image to your workpage -- this will form both frames of your animation. Position the image where you want your animation to end -- its final position.

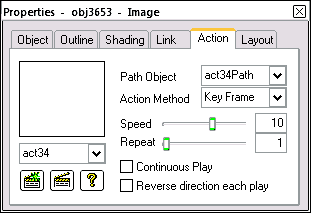
2. With image selected, open the Quick Editor > Action tab.

3. Click the Action button (bottom left) -- the Quick Editor will assign an action. Our screenshot to the right shows "act34", but your number will be different.

4. Select an Action Method of "Key Frame" from the drop-down list box. The Key Path time-line editor will open. Notice that you now have an associated path showing in the Quick Editor --  this is the path your image will move along. Our example shows Act34Path.

Tool: Image Editor
Setting a key frame path
Key Path time-line editor

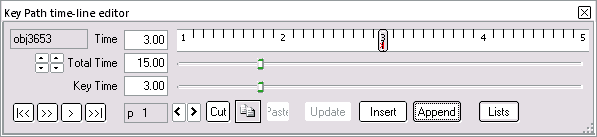
5. Drag the Key Time (Keyframe Editor top slider) to about the 3 second point.

6. Click Append. This will set the start and end points at 3 seconds. They are superimposed.

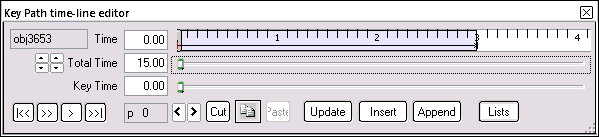
7. On the Key Time slider, drag one of the points back to the zero position. Note that the active point shows in red; inactive is dark blue or similar. The screenshot below shows the zero point is active. It shows as "p 0", and that you can select either p(oint) 0 or p 1 by clicking the little arrow buttons.

Key Path time-line editor

8. With the p 0 active (showing in red), resize your imported image image down to thumbnail size by dragging the edges. If you hold the Alt key down on your keyboard, the image will retain its aspect ratio. Position the small image where you want the animation to start.

9. Click Update. This will update the first point to start at the small image.

10. View the animation on your workpage by dragging the Total Time slider back and forth between the 0 and 3 positions.

11.  Select the image, then with the Quick Editor > Object tab, set Anti-Alias and Re-Render both off. This tells SiteSpinner not to make a thumbnail image. Rather at run time, the browser will make it by scaling down the large image.

12. Preview. Your image should now perform similarly to the Lake image at the top of this page.


Editing the action

To edit a frame, perhaps to change image size or position:

1. Click the action point you want to change on the Key Time slider of the Keyframe Editor. Or select the point using the the little arrows. The point will change to red to show that it is active.

2. Make your changes to image size or location.

3. Click the Update button 


Editing the path

You can edit the path, Act34Path in our example as described above. However a path is just like a shape, and as with shapes you can edit it with the Vertex Editor.


See also: The Key Frame Editor


SiteSpinner Pro banner