It is traditional to try out a new program with a "Hello World", and we're going to follow the tradition -- here are the steps to making two "Hello World" pages announcing your presence on the Web to the whole world. (If they are watching!)
Let's build a simple two-page project. Each page will be quite similar; some text, an image, a link which points to the other page. We'll save it all in a project named "HelloWorld.ims". Here are the steps we cover in this tutorial:
Preview this page (single-page spyglass button on the top toolbar, or hot key F7). Keep it open in your browser window so you can read these instructions.
First step -- fresh project
Click on the main menu File > New Project (top left corner). There is also a button top left. If your workpage wasn't blank before, it will be now. You are about to start work on your index page. It will have the name "index" showing in the drop-down page list at the top of the work page. This is the file name you should use for the opening page of any new project, so don't change it without good reason.
The next step is to save your project - click the Save button on the left of the top toolbar. Give the project a new name - HelloWorld. SiteSpinner automatically adds a .ims file extension.
Now as you add to your pages click the Save button periodically. Ctrl+S is a keyboard shortcut that does the same thing. This ensures that if Anything Bad happens to your computer you won't lose too much work.
First text Click on the Text button on the left-hand (tools) toolbar. This opens the Text Editor with a blank slate. As you would with a new word processor, play around a little - type some text and try a few fonts. Stick with common fonts that everybody is likely to have installed on their computers. Arial, Times New Roman and Verdana are good choices. Set font size and color too.
Put a big bold Hello World!!! near the top. This one is in bold 18-point Verdana font.
When you are ready, click the "Save and Close" button at the bottom of the Text Editor. Position the text object so that it is near the top of your workpage and stretch it horizontally (by dragging the edges) so that it is 600 pixels wide. Check the ruler bar at the top of your page for the size. Make sure you have the ruler bar and snap grid turned on - see Grid guide buttons.
First image Click the Mona Lisa button on the tools toolbar. Browse around your computer to find a smallish image that will fit comfortably on the page. There are a few images in the ClipArt folder -- here is a rose.
Depending on where you installed SiteSpinner, you might find it in a location like this: C:\Program Files\Virtual Mechanics\SiteSpinner Pro V2\ClipArt\flower_temp.jpg
Drag the image around to position it just where you want.
Preview
Now let's see how the page looks in your browser. Click a spyglass preview button the top toolbar. There are two buttons: the first previews the current page, the second previews all pages in your project. In this case, as you have only one page in your project, either button will work just fine. When finished, return to your workpage.
The last thing to put on this page is a link to page2. But we don't have a page2 yet, so let's make one now.
Your second page
Click the "Add New Page" button on the top toolbar and page2 will appear. This is a good time to rename it. Where you see the "page2" text overtype it with something meaningful. Use Hello2 in this case.
Don't use spaces or punctuation in page names as this can lead to trouble later. Just use plain letters and numbers. Use something meaningful and keep your page names short.
If the entire name does not show in the edit box, it is too long.
Add text and an image Just as you did for your index page, add some text and another image to your second page.
Your first link
Now you are ready to make your first link. Make sure you are still on your second page (Hello2) then create another text object that says something like "Link to Index Page". Save and Close the Text Editor. Position the text object on your page where you want it.
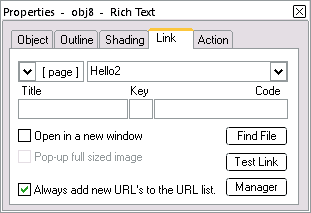
Select the new text object by clicking it once. Open the Quick Editor then click the Link tab. Select [ page ] as the link type (left hand drop-down box). Select index as the link URL (right hand drop-down box). You should have something like this:
On the second page
Preview again; this time you will be looking at your "Hello2" page. Click on the link to the index page. If there are no mistakes, your browser should now jump to the index page. Close your browser.
Your second link In the drop-down page list at the top of your page select the index page again. As you did on the Hello2 page, place a link like this:
Link Text: Link to Hello2 page
Link Type: [ page ] Link:URL : Hello2 (select from the drop-down list box, don't type it)
On the index page
Preview all
This time clicking the double-page spyglass button will build both pages. If the links are working properly you should be able to navigate between the two pages by clicking on the links you have made.
Just in case you have trouble you can find a "Hello World" project file in the Virtual Mechanics\SiteSpinner Pro V2\Tutorials folder. Yours will be much better!
Reopen an existing project
Because you saved your project before or as you exited SiteSpinner, it is safely stored on your disk. There are several ways you can reopen the project:
Use Windows Explorer to find your project file, in this case it will be called HelloWorld.ims. Double click on it and it should open in SiteSpinner.
Open SiteSpinner then select File at the top left of the menu bar. In the menu that appears, in the recently used files list at the bottom of the menu, select your filename.
If your file does not appear in the recently used files list, click Open Project...,this will allow you to browse to it and then select it.
In the "Open Project" window there is a preview panel on the right hand side. This allows a sneak preview of the project so you can be sure you are selecting the right project file.
Next
Now you have built your first two-page project. You have previewed it in your browser and it looks fine -- we hope!
Next you need to create the html files and get them, and the two images uploaded to your server. This is called "Publishing" and is the subject of the next tutorial.