


Default browser
The basic preview from the hot keys F7 and F8, or the spyglass buttons, uses your default browser for the preview -- that is the one that should open if you double-click on an html or htm file. On a new computer, this will usually be Internet Explorer.
Sometimes after uninstalling a browser, nothing happens when you double-click an html file, or Windows will start a dialog asking what program to use to open the file. You can follow this dialog, or open the browser you want and look for the setting that makes this browser the default. Eg:
- IE8: Files > Tools > Internet Options > Programs tab > Make Default button
- Firefox: Tools > Options > Main tab > Check Now button
- Opera: Tools > Preferences > Advanced > Programs > Check if Opera is default browser on startup
Follow the above steps if you want a different default browser to your current one. If a browser other than the three listed above, you will need to search for the equivalent feature that makes it the default.
Other ways of setting a default browser are:
- Set your Windows File Association for html and htm files
- Via the Windows Start Button > Set Program Access and Defaults


Preview in other browsers
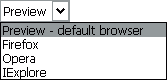
On the top of your workpage in the Publish toolbar is a drop down list of browsers, headed by the default. If you have other browsers installed, it will show these too. Select whichever browser you want, then to preview, click one of the preview spyglass buttons or hot keys.
To add another browser to the list, or amend the way the browser starts up, see the next section.
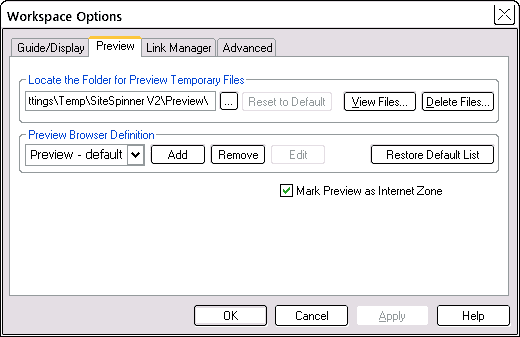
Define a new browser
The image above shows the settings to define a new browser -- available from the main menu > Options > Preview Options. There is a drop-down list of browsers already set up -- this should show the commonly used browsers if you have them installed.
There are buttons to add a new browser and remove or edit an existing one. Removing a browser removes it only only as far as SiteSpinner is concerned -- it doesn't uninstall it from your computer. There is also a button to restore the browser list to the original -- in case you screw up badly.
The Edit button allows you to edit your browser settings. Clicking on it should produce a display like this:

The Executable box hold the path and name of the browser, here firefox.exe -- or it would if the edit box was big enough. Although you can type directly into the Executable box, we suggest you use the small browse button (rectangled) -- this avoids the possibility of typos. When browsing for a browser, you will be looking for a file of type .exe in the install folder(s) for your browser, usually under C:\ProgramFiles\.
The parameters shown in the image above "[%PATH%][%FILE%]" are computer-speak for the file path and file name of the file to be displayed:
- The [%PATH%] is the path to your preview folder
- The [%FILE%] is the name of the current page showing in your workpage
To avoid problems, wrap the whole thing in double quotes -- some browser need them and some don't.
Normally you wouldn't change either parameter, but you can for special purposes. Suppose you want to always preview some page elsewhere on your hard disk. Then you might enter something like this instead: "C:\MySpecial Folder\MySpecialFile.html".

The Preview files
As explained previously, when you preview a page or project, SiteSpinner first generates the html page or pages required then your computer opens the current page in your default browser, or whatever other browser you have set.
The default location for the html pages (preview files) is a temporary folder under your Windows user name, shown in the left-hand edit box of the image below. In the process, SiteSpinner will, if necessary, create a Geometry folder to store any image files it creates.
There are automated clean-up program that will delete temporary folders -- this means your preview files! Generally it won't matter if everything is deleted -- but it does mean that you have to preview "All" again.
This is unlikely to cause a problem if you work on single small projects; however, if you have two or more interlinked projects, or large projects that take a while to fully build, or you keep special files in your preview folder, you may wish to avoid this automatic deletion. Do so by changing the location of your preview folder -- click the Browse button and follow the dialog. You can use an existing folder or create a new one -- but make it outside the Temp folder!
Other options here allow you to:
- Reset to Default: sets your preview folder back to the Temp folder
- View Files: opens a normal Windows Explorer window. Not only can you you view the files, you can also copy and paste to or from.
- Delete Files: will delete everything in the folder, even files you might have write-protected.
Some good reasons to delete preview files:
- Free up disk space
- You want to know what files your page creates. Delete preview files, preview your page, then go see what files have appeared
- If you have more than one project, you may need to avoid confusion between projects
- Your projects may preview faster -- if you have many months of clutter.
Adding files to the preview folder
Sometimes, you will use special code that requires files (often images) to be in a particular place on your site. Blank link types do this too. Often this will be the root folder of your site. Or it may be a folder under your root folder, perhaps called images/, not to be confused with the one called image/ used by SiteSpinner.
This poses a problem in preview, because unless you make changes to the code or links, previewing will give "file not found" errors. Fortunately, for previewing, the root folder is just the preview folder itself -- the one that contains your html files. So the answer for files that will be in your site's root folder, is to duplicate them in your preview folder.
For other folders under the root folder, say /images, duplicate the images folder in your preview folder, and put any special images you want there. You could use this arrangement for any folders that are at different levels below the root folder of your site.
The idea is to duplicate the folder structure of your site in your preview folder, considering the preview folder as the root folder. Then you can preview normally.
To put something in your preview folder, use the View Files button. Then you will be able to create any special folders inside your preview folder, alongside the existing geometry/ folder. Use Windows Explorer to copy the special files into the correct places of your preview folder.
Doing this won't actually create the folders or files on your site -- the only reason is to allow you to preview.
As the preview folder is a temporary folder, it is subject to deletion during cleanup operations. For this reason, only put files there that you can afford to lose. Or shift the location of your preview folder. See Preview files.
The Import Object tutorial has an example of a Flash object that expects two images in the root folder.