Use the Selection Tab of the Shading Editor dialog box to select a shading component for editing, create a new shading component, or set a texture file path or fill method.
The Selection Tab of the Shading Editor lets you select a shading component to edit or create a new one.
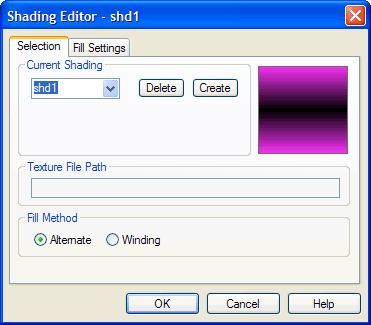
Controls on the Selection Tab of the Shading Editor dialog box include the following:
| Field/Control | Description |
| Thumbnail View | Displays the shading component currently selected for editing. |
| Current Shading | If you have opened the Shading Editor dialog box without first selecting in the Work Window an object bearing a shading component, the name of the last available shading component (sorted alphanumerically) will appear selected. However, you may select any shading in the project from the drop-down menu. If you have first selected an object bearing a shading component and then opened the Shading Editor dialog box, its shading is displayed. |
| Delete | Click to delete the currently selected shading component from the system. Once you confirm the delete operation, all objects bearing the deleted shading component will then bear a “no shading” reference. |
| Create | Click to create a new shading component. It will appear in the Current Shading box. |
| Texture File Path | Displays the location path of a textured fill shading component’s source image. You may edit the path to specify a different source image, if desired. |
| You can quickly choose a path to a textured fill source image by clicking the Scale, Stretch, or Tile buttons on the Fill Settings Tab of the Shading Editor dialog box. For more information, see Color Dialog Box. | |
| Fill Method | Click a radio button corresponding to the way you want to apply the fill to the shading component. |
| OK | Click to accept the current settings and exit the dialog box. |
| Cancel | Click to cancel the operation and close the dialog box. |
| Help | Click to open a context-sensitive help topic. |

