Scaling means resizing, stretching, or shrinking an object to give it new overall height and width dimensions. Any object can be scaled. However, the scaling operation will have different effects depending on the type of object it is being applied to. For example, scaling a text object will not resize the text; rather it will resize the text box and cause the text inside to re-wrap.
To avoid pixilation or jagged lines when you are enlarging an object such as an image or vector drawing, be sure the object's anti-aliasing option is enabled. Anti-aliasing is enabled by default for all rendered object types.
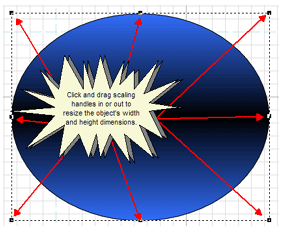
The easiest way to scale an object is manually in the Work Window using your mouse. With an object selected and either the Page Layout or Object Edit buttons in the Components Bar activated, you can click and drag the object's eight scaling control points in or out to resize the object's height and width dimensions. You will know that you have grabbed a scaling control point when your mouse pointer becomes a double-headed arrow. As you drag, the new pixel dimensions of the object are displayed near the mouse pointer.
To maintain the object's aspect ratio, press and hold the CTRL key while dragging a scaling control point with your mouse.
You can scale an object selected in the Work Window using your mouse and/or keyboard.
You can also resize a selected object in 1-pixel increments by pressing and holding the Shift key while pressing the Up, Down, Right, or Left arrow keys. Similarly, you can resize an object with constrained proportions by pressing and holding the Shift and CTRL keys while pressing a directional arrow key.
When the Snap Grid is enabled, an object is scaled when the mouse is used at the current snap grid resolution. For more information, see Snap Grid.
If you require precision when scaling objects, you can use the Horizontal and Vertical Scaling controls in the Object Editor or the X and Y Scale controls in the Quick Properties Editor. You can select an object to scale, and then use the controls to adjust horizontal or vertical sizes changes by a factor of 1/100th. For more information, see Object Editor Dialog Box and Quick Properties Editor Dialog Box .
Use any of the following procedures to resize (scale) an object:
In the Work Window:
 in the Components Bar
OR
Click
the Object Edit button:  in the Components Bar.
By default, unless another tool is selected in the Components Bar, the Page Layout button is active.
You can also resize an object in "baby steps" using the directional arrow keys. With an object selected, press the Shift key and the Left, Right, Up, or Down arrow keys to resize the object in 1 pixel increments along either the horizontal or vertical axes.
You can scale an object with constrained proportions by pressing and holding the Shift and CTRL keys while the Left, Right, Up, or Down arrow keys.
Using the Quick Properties Editor:
OR
Click
the Quick Properties Editor button:  in the Components Bar
OR
Select ObjectQuick Properties Editor.
The Quick Properties Editor dialog box will open.
OR
Enter a proportional resize value in the box.
Use the Y Scale spinner to make the object longer
OR
Enter a proportional resize value in the box.
Using the Object Editor:
OR
Click
the Object Editor button:  in the Align Bar
OR
Select Object>Object Editor.
The Object Editor dialog box will open.
OR
Enter a proportional resize value in the box.
Use the Vertical Scaling spinner to make the object longer
OR
Enter a proportional resize value in the box.
You can reverse or flip a rendered object horizontally using the following procedure:
OR
Click
the Object Editor button: in the Align Bar
OR
Select Object>Object Editor.
The Object Editor dialog box will open.
You can flip a rendered object vertically using the following procedure:
OR
Click
the Object Editor button: in the Align Bar
OR
Select Object>Object Editor.
The Object Editor dialog box will open.

