Even if you are only a novice user of Microsoft® Windows® applications, you are undoubtedly familiar with the standard Save As dialog box, allowing you to name or rename a project file and choose a directory location in which to store the file. SiteSpinner® Pro’s Save Current Document As dialog box offers the same functionality but with one additional setting option.
The Save Current Document As dialog box allows you to use an existing project file as a template for other projects. By “saving off” a copy of a project file, you can protect the structure and content of the original file and be free to experiment with the copy.
SiteSpinner® Pro V2 comes packaged with many different project templates in a variety of styles to help you get started designing your own web site. Find a template you like, open it in the Work Window, and then select FileSave As command to use the Save Current Document As dialog box to “save off” the template as your own project file. For more information, see Project Templates.
The Save Current Document As dialog box allows you to make a copy of an existing project (*.ims file).
To open the Save Current Document As dialog box, with a project open in the Work Window, select File>Save As.
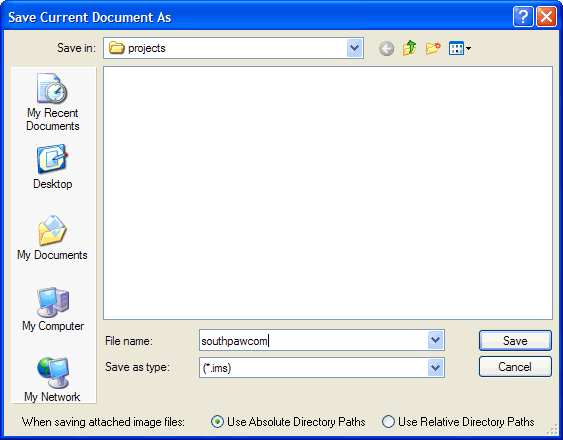
Controls on the Save Current Document As dialog box include the following:
| Field/Control | Description |
| Save in | Select from the drop-down list the directory on your system to which you want to save the current project file. The default directory is &ldots;\Program Files\Virtual Mechanics\SiteSpinner® Pro V2\projects. |
| File Name | Enter an alphanumeric name for your project. Avoid using special characters. |
| Save As Type | Do not change this field. When saved, the project file will be given an .ims extension. |
| When saving attached images files | Click the radio button corresponding to the disposition of resource files in the saved project. Click the Use Absolute Directory Paths option to use the full file path including the drive letter to reference resource files (default option). Click the Use Relative Directory Paths option to construct a relative directory path from the publish directory to the actual location of the resources. |
| This only has a visible effect when you move the project files. For example, if your project file is at C:/A/test.ims and an image in the project is at C:/A/B/pic.jpg, saved in absolute mode, you can move the project anywhere and it will look to C:/A/B/pic.jpg fro the image. In relative mode, if you move it to D:/One/Two, it will look to D:/One/Two/B/pic.jpg. If you move it to C:/G/H, it will look to C:/G/H/B/pic.jpg. | |
| Save | Click to accept the current settings and exit the dialog box. |
| Cancel | Click to cancel the operation and close the dialog box. |
Save a SiteSpinner® Pro project using any of the following commands:
Select File>Save
Click the Save
button:  in the
File bar
in the
File bar
Press the CTRL+S keyboard shortcut
If you are saving the project for the first time, the Save Current Document As dialog box will open, prompting you to enter a name and directory location for the project file.
Save a SiteSpinner® Pro project with a different file name and/or to a different directory location using any of the following commands:

