
When you open a new SiteSpinner® Pro project, a new, blank page will appear in the Work Window. By default, this page is named “Index.” You can view the name of the currently displaying page in the Page Selection combo box in the Page Bar.
When you add (or “append”) a page to your project, the system will assign it a default, incremented page name. You may change the system-given name to a different name that makes more sense to you in the context of your project, and it’s a good idea to do so, with the exception of the “Index” page. The “Index” page name should not be changed, because an index page is required if you want a default home page.
Your new page name may contain up to 40 alphanumeric characters. Avoid using special characters, such as “-space- ~ ! @ # $ % ^ & * ) { } [ ] : ; ’ < , > . ? / “.
By default, SiteSpinner® Pro will give a published web page the same name as its origin page in your project. For example, a project page named “services” will be named “services.html,” if you are publishing to the HTML format, or “services.svg,” if you are publishing to the SVG format. You may change the names of your published output files on the Pages Tab of the Publisher dialog box. For more information, see Publisher Dialog Box.
|
|
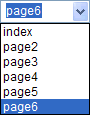
The Page Selection combo box in the Page bar shows system-assigned page names, left. The Page Selection combo box shows all the page names renamed (except the Index page), right.
Use either of the following methods to rename a project page:
In the Work Window:
In the Page Editor:
OR
Right-click on the Work Window and select Edit Page Properties
OR
Press the CTRL+SHIFT+E keyboard shortcut.
The Page Editor dialog box will open.
If you enter the name of page that already exists in the project, the system will drop the last letter of the new page name to distinguish it from the existing page.
Page names may contain up to 40 alphanumeric characters. Avoid using special characters, such as “ ~ ! @ # $ % ^ & * ) { } [ ] : ; ’ < , > . ? / “.

