Use the Options Tab of the Geometry Editor dialog box to establish the name, file name, and directory location (if the geometry is an image) of a geometry component and to set rendering options for publishing.
Set the identity and location of a geometry or establish rendering settings using the Options Tab of the Geometry Editor dialog box.
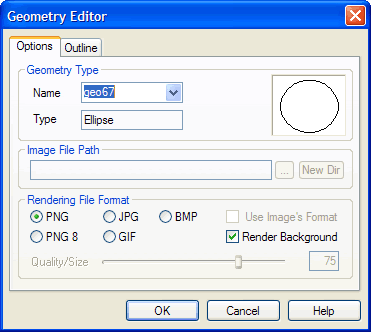
Controls on the Options Tab of the Geometry Editor dialog box include the following:
| Field/Control | Description |
| Thumbnail View | Displays the object currently selected for editing. |
| Geometry Selection | If you have opened the Geometry Editor dialog box without first selecting an object in the Work Window, the geometry most recently edited will appear selected. However, you may select any geometry in the project from the drop-down menu. If you have first selected an object and then opened the Geometry Editor dialog box, the geometry name is displayed. |
| Type | Displays the geometry type (i.e., Rectangle, Ellipse, Import Object, Rich Text, etc.) |
| Image File Path | Available only with an image object selected. Displays the location path of the object’s source image. You may edit the path to map to a different source image, if desired. |
 |
Available only with an image object selected. Click to display the Open dialog box, allowing you to change the path of the selected object’s source image. |
| New Dir | Click to open the Change Image Directory dialog box, allowing you to globally remap the source directory locations of all image objects in the project. For more information, see Change Image Directory Dialog Box. |
| Rendering File Format | Click a radio button corresponding to the output file format you wish to assign to the selected geometry. Choose from PNG, PNG 8, JPG, GIF, or BMP. For more information, see Rendering and Re-Rendering. |
| Use Image’s Format | Available as a default option only for image objects. Click to un-checkmark to activate the Rendering File Format radio buttons, allowing you to assign a different output file format to the selected geometry. Otherwise, the image’s original format will be used. For more information, see Rendering and Re-Rendering. |
| Render Background | Click to checkmark to render any objects on the page that are behind this geometry into the background of the geometry’s output image. For more information, see Render Background. |
| OK | Click to accept the current settings and exit the dialog box. |
| Cancel | Click to cancel the operation and close the dialog box. |
| Help | Click to open a context-sensitive help topic. |

